News
THE POWER OF OUR ANILINE LEATHER DYES
Some leather dyes for Anilines are weak, ineffective or disperse awfully on to the surface, here at Buffalo are leather renovator dyes are formulated to flow out well on the surface giving you an easy dispersion rate and a fabulous result too!
The results on the image speaks for itself, the rich colour and natural result only emphasises the natural beauty of this wonderful vintage leather.
Most tradesmen shy away from restoring aniline leather presuming they are unpredictable and difficult to revive, we've taken all the guesswork out so you can get on with the job.
We provide a good range of standard colours or we can colour match to any aniline samples provided to us.
Products Used On This Project:
Gentle Leather Cleaner
Aniline Dye Gel
Intensive Luxury Conditioner
Applicator Sponges - Great even dispersal
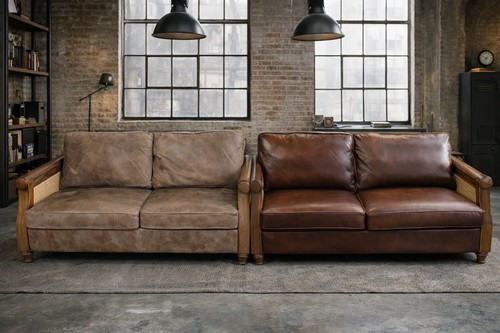
TRANSFORMING A TAN LEATHER SOFA INTO RICH DARK BROWN

There’s something incredibly satisfying about breathing new life into a tired piece of furniture, especially when the results are this dramatic. In this project, our customer restored a worn tan leather sofa and transformed it into a deep, luxurious dark brown using our superior extra strong penetrating leather dye.
This wasn’t just a colour change—it was a full restoration that brought back depth, character, and durability.
Before: The Starting Point
The original sofa had seen better days. The tan finish was faded and uneven with years of wear. While structurally sound, its appearance no longer suited their interior. Rather than replacing it, they chose to restore and recolour, saving both money, the environment whilst achieving a completely refreshed look.
Step 1: Deep Cleaning & Surface Preparation
Before applying any dye, proper preparation was essential, the leather was thoroughly cleaned to remove dirt, body oils and surface contaminants that prevent dye penetration.
Step 2: Applying the Dark Brown Leather Dye
Using our high-performance leather dye, our client carefully applied 1 application of our extra strong aniline dye which gives excellent coverage and colour depth with a flexible finish that moves with the leather. The transformation really begins to show at this stage, as the sofa shifts from tired tan to deep, elegant brown.
Step 3: Finishing
Once the desired colour was achieved, we sealed the surface with a protective wax coat.
This final layer:
- Enhances durability
- Adds a natural sheen
- Protects against future fading
What was once a faded tan sofa is now a rich, dark brown centerpiece that looks and feels like new. The colour is even, the finish is smooth, and the overall aesthetic is completely elevated.
Who carried out this transformation: Dom Blades at Contact Cleaning
CAR DETAILING FOR LEATHER SEATS - PROFESSIONAL ADVICE
Car valeting is often marketed as a professional, meticulous service that restores a vehicle’s appearance to near-showroom condition. However, one area where standards can slip is in the treatment of leather interiors. The misuse of cleaning products by car detailers on automotive leather is more common than many car owners realise—and the consequences can be both cosmetic and costly.
Understanding Automotive Leather
Modern car leather is not the same as traditional leather. Most automotive leather is coated with a protective coloured layer, designed to resist everyday dirt, UV damage, and wear. Treating it incorrectly—especially with inappropriate or overly aggressive products—can damage this coating rather than nourish the material.
Common Mistakes Made by Valeting Companies
1. Using Car Bodywork Cleaners
Some valeting services cut corners by using all-purpose cleaners or car body products not designed for automotive leather. These can be too harsh, stripping away the protective coating and leading to removing the invisible protection on the leather causing dryness, cracking, or discoloration.
2. Overuse of Strong Degreasers
Degreasers are useful for heavily soiled areas on metal or even fabric, but when they can degrade the leather’s finish causing it to peel. This often results in a dull, worn look and can accelerate long-term damage.
3. Applying Silicone-Based Dressings
Shiny finishes may look appealing at first glance, but silicone-heavy products can leave a greasy residue. This not only attracts dust and dirt but can also make seats resistant to to restoration and repairs leaving you with a costly replacement or re-trim of the whole seating, not only that silicones can make the seating slippery and uncomfortable. Over time, build-up can be difficult to remove.
4. Skipping Proper Conditioning—or Overconditioning
Some valeters either neglect conditioning altogether or apply too much product. Over-conditioning can clog the surface and lead to a sticky feel, while under-conditioning (or using the wrong type) can leave leather unprotected.
Why Does This Happen
The root causes often come down to speed, cost, and lack of training. High-volume valeting operations may prioritize efficiency over precision, using one-size-fits-all products across different surfaces. Additionally, not all technicians receive proper education on material differences, leading to well-intentioned but incorrect practices.
The Impact on Vehicle Owners
Improper leather care can lead to:
* Premature wear and cracking
* Fading or discoloration
* Loss of resale value
* Increased repair or re-upholstery costs
* What might seem like a quick clean can ultimately shorten the lifespan of the interior.
How to professionally treat the leather - Ask Questions from those who know such as here at Buffalo
Beforetreating a leather, ask us what products and methods are used specifically for car interiors, and we'll suggest the most effective safe product to use.
Here at Buffalo we have a huge range of products and a colour matching service at our finger tips, we can even provide a 1hr product overview session free of charge if you spend over £100, this session is invaluable for learning how to apply the products or how to tackle different issues, you can even see the results for yourself!
Final Thoughts
Car valeting can be a valuable service, but not all providers deliver the same level of care. After a detailing service, leather should feel natural—neither greasy nor overly dry—and retain a matte, factory-like finish. Leather interiors, in particular, require a nuanced approach that respects the material’s modern construction. By understanding the risks and asking the right questions, you can avoid unnecessary damage and ensure their vehicle’s interior remains in top condition for years to come.